What’s the secret behind a high-end collision shop? “The Collision Repair Process” video details the 12 steps to returning your vehicle to you in showroom condition. The secret? It’s the highly-skilled, talented and professional people taking care of your vehicle at each step along the way.
Watch as the Today’s Collision team displays their expertise and dedication from the moment you are in a car accident until the moment you drive off the lot. Today’s Collision Repair Centers has been repairing vehicles for over 35 years, and we’ve learned that helping YOU understand the steps we take to repair your vehicle, helps US communicate with you along the way. Today’s Collision Owner, Bobby Cobb, walks you through the steps, providing an explanation of how your car travels through the shop on its way back to you!
Key Moments:
00:26 Getting an Estimate for Car Repairs (STEP 1)
02:08 Pre-Scanning & ADAS (Advanced Driver Assistance Systems) (STEP 2)
02:46 Disassembly & Blueprinting to OEM Specifications (STEP 3)
03:43 Writing a Supplemental Insurance Estimate (STEP 4)
04:43 Auto Parts Verification & Matching (STEP 5)
05:23 Repairing the Vehicle Structure & Aluminum Repairs (STEP 6)
06:11 Auto Body Repair (STEP 7)
06:47 Preparing the Vehicle for Paint including Prime & Jamb (STEP 8)
07:41 Formulating an Exact Factory Paint Match Color & Painting the Vehicle (STEP 9)
08:36 Reassembling the Vehicle & Replacing Final Moldings & Detail Pieces (STEP 10)
09:04 ADAS Calibrations & Testing (STEP 11)
09:44 Performing a Quality Control Inspection & Detailing (STEP 12)
Step 1: THE INITIAL ESTIMATE After an accident, the first step to repairing your vehicle is to obtain an initial estimate of the damage.
Step 2: PRE-SCAN & PRE ALIGNMENT Once your vehicle arrives at our facility, we will run a series of pre-repair diagnostics, which includes a complete ADAS (Advanced Driver Assistance System) scan. ADAS is responsible for many of the safety and warning features in your vehicle.
Step 3: DISASSEMBLY Our team has been trained by OEMs (Original Equipment Manufacturers) on the proper way to disassemble your vehicle and complete a “BLUEPRINTING”.
Step 4: SUPPLEMENTAL ESTIMATE If, during the disassembly stage, additional damage is found, our estimators will rewrite the repair requirements needed to repair your vehicle back to pre-accident condition, and produce a “Supplemental Estimate.”
Step 5: PARTS ORDERING & VERIFICATION Any previously, pre-ordered parts that are currently on-site for your vehicle’s repairs are verified and the secondary order for additional parts discovered during the disassembly process is placed.
Step 6: STRUCTURE REPAIR Our technicians utilize a computer-based measurement system or an approved OEM JIG system to ensure the structure of the vehicle is restored to factory specifications.
Step 7: BODY REPAIR The Body Repair Department replaces all bolted, damaged exterior panels, and all metal finishing that may be required. This includes repairing all dents and scratches. Sheet metal is installed and aligned.
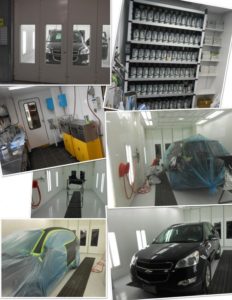
Step 8: PAINT PREP New parts are “raw” and need to be prime-sealed, and jamb-colored. Any other panels that we repaired will be primed and sealed.
Step 9: PAINT Our expert paint technicians determine the proper color formula and codes, which are entered into the computerized mixing scale.
Step 10: REASSEMBLY Our technicians will reassemble your vehicle and all final moldings and detail pieces will be replaced. All of the vehicle’s systems are checked for proper operation during this process.
Step 11: CALIBRATION & TESTING We utilize the most advanced technology in the industry to calibrate and test your vehicle to ensure both structural and operational integrity. A post-repair diagnostic ADAS (Advanced Driver Assistance System) scan will help us clear any indicative codes remaining.
Step 12: QUALITY CONTROL & DETAILING Our Quality Control review occurs at this stage, which includes a final inspection by our technicians to ensure that the vehicle is restored to its pre-accident condition. Returning your vehicle to you is our favorite part of the day, because we know that every member of our team, at each step along the way from the initial estimate, through disassembly, and paint to the final testing, is dedicated to ensuring that you are 100% satisfied with your repairs.